Content
There are several types of irrigation that you can independently organize at your dacha: sprinkling, subsurface and drip irrigation. The most popular and effective for vegetable crops is the latter type of irrigation. It can be used in vegetable gardens and greenhouses. How to do drip irrigation with your own hands, and what materials are needed for this, will be discussed further.
How the system works and what is its advantage
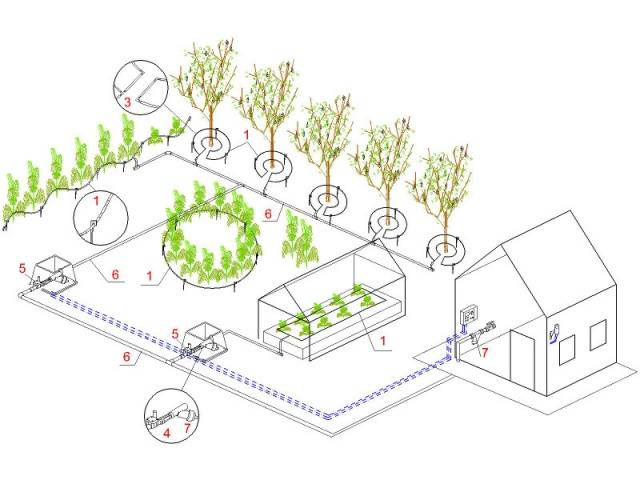
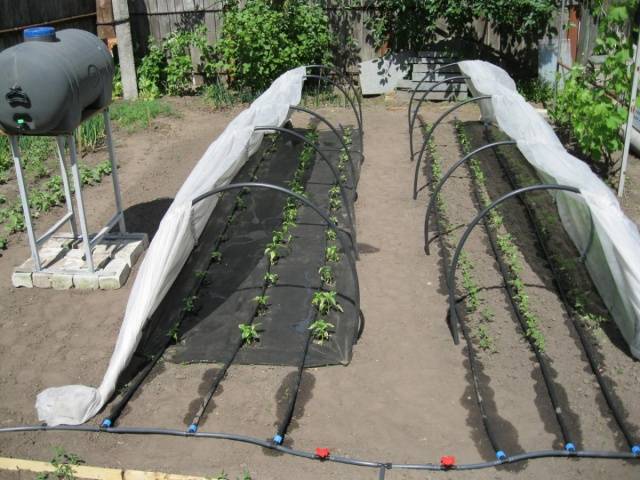
Each person can equip his own plot with irrigation. To make a drip irrigation system for a summer cottage, you will need a plastic or stainless steel container for water, perforated tapes, PVC pipe, connecting fittings, ball valves and a filter. The barrel is mounted at a height of at least 1 m. The higher the container is located, the greater the water pressure in the pipeline system.

Drip irrigation works according to the following principle: water flowing out of the container by gravity through the pipe, passing through the filter, is directed along all the branches of the system, and through the holes in the drip tapes flows out in portions under the root of the plants.
Drip irrigation has several advantages:
- the system can water the entire country garden and crops growing in the greenhouse;
- due to the possibility of adjusting the flow of water from the droppers, the system is suitable for the simultaneous irrigation of small garden crops, as well as large garden trees and shrubs;
- portioned watering saves water consumption, strength and time of the vegetable grower;
- an additional tank for pouring fertilizers on the pipeline allows you to automatically fertilize the plants during irrigation.
The main advantage of drip irrigation is the benefits for the plants. Water regularly falls under the root, while a certain portion of moisture does not allow the soil to dry out and does not swamp it.
Step-by-step instructions for making drip irrigation
So, we figured out the principle of irrigation and what materials are needed for it. It's time to find out how to make a do-it-yourself drip irrigation system from purchased materials. It is better to start the work by drawing a plan, which will display a diagram of the entire area set aside for drip irrigation.
The structure of drip irrigation in a greenhouse is no different from its installation in an open area, therefore, we carry out all further work, following the instructions:
- To develop a drawing, you need to take a clean Whatman paper, a pencil and a ruler. A diagram of the entire land plot allocated for drip irrigation is applied to the paper. The width and length of the rows are measured with a tape measure and displayed on the diagram on a certain scale. This also includes all trees, shrubs and other plantings growing on the site. When the site plan is ready, they draw a diagram of the passage of all communications. This includes everything: the central pipe, branches with perforated bands, the location of the tank and the source of the water intake. The drawing must be taken seriously. It will help you calculate the required amount of materials that you need to purchase. The diagram must show all connecting nodes with taps, fittings and a filter.

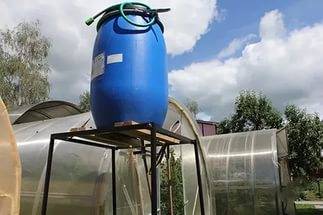
- The manufacture of a drip system begins with the installation of a water tank. The tank is best taken from stainless steel or plastic.A metal cabinet with a height of 1 to 2.5 m will have to be welded under the container. Such dimensions depend on the relief of the site. The tank with the curbstone is placed so that all branches of the drip system are located approximately at the same distance from it. This achieves the same water pressure in the pipeline. Plus, it is necessary to take into account the convenient supply to the tank of the pipeline for pumping water. If drip irrigation is done in a greenhouse, the barrel can be installed both outside and inside. The second method is more commonly used for heated greenhouses where vegetables are grown in winter.Attention! When using a PVC tank for a drip system, it must be borne in mind that its walls should be opaque, preferably black. If the plastic allows sunlight to pass through, the water in the container will quickly bloom, and these algae will clog the filter and droppers during watering.
- After installing the barrels, proceed with the installation of the pipeline. For the central branches, take a plastic pipe thicker than for the branches. Usually a diameter of 32-50 mm will be sufficient. HDPE pipe as a hose is sold by the bay. To make it easier to work with it, the pipe is rolled out on the site, and they give it time to lie down. Plastic softened in the sun will become more pliable. The leveled pipe is cut into pieces of the required size according to the drawing, and it is laid along the beds, but across the rows with growing plants. Fittings are cut in opposite each row for connecting perforated tapes.
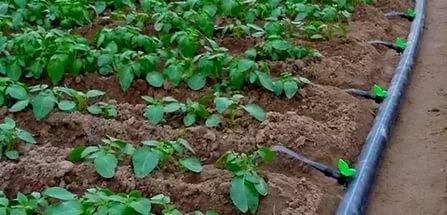
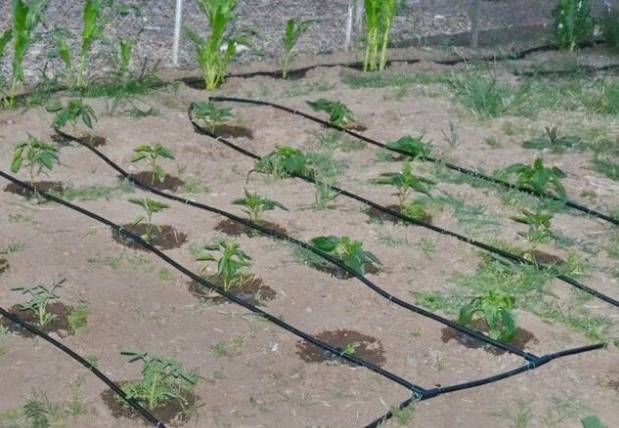
- After connecting one end of the perforated tape to the cut-in fitting, they begin to lay it out in a row as close to the growing plant as possible. It is necessary to pay attention that the drip holes are directed to the stem of the plant, that is, to the side. If you lay the tape with the holes down, over time they will clog with damp soil. At the end of the row, the tape is cut off, and its hole is closed with a plug. If the rows in the garden are located close to each other, you can not cut the tape, but immediately wrap it on the second row. Then the second end of the tape, spanning two rows, is connected to an adjacent fitting on the center pipe. The resulting drip tape ring does not require the installation of plugs, plus it allows more rational use of the material.
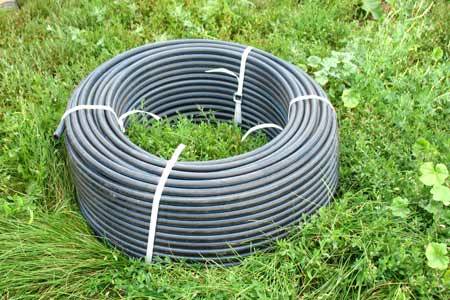
- It is quick and convenient to make an irrigation system from drip hoses, but they have a short service life, up to a maximum of 5 years. Some summer residents prefer to replace PVC tapes with pipes with self-embedded droppers. Now we will look at how to make drip irrigation yourself without perforated tapes. For work, you need a coil of pipe with a diameter of 20 mm. Any thin-walled hose will do. It can be easily cut with a hacksaw or special scissors.
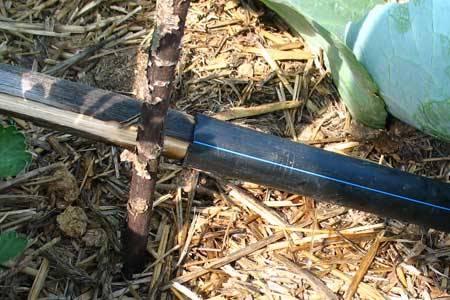
- It is not very convenient to bend the pipe with a ring into two rows, as was done with the drip tape, so it is cut into pieces. Each piece of pipe must match the length of the row. Pieces of pipes are laid out in their place in rows and points are marked on them for drilling holes for droppers. Usually, crops are planted at a distance of 50 cm from each other, so you can apply the markings using a tape measure, following this step. It is convenient to use a black hose with a longitudinal blue stripe so that the holes on the pipe do not turn out to be a zigzag arrangement. It will help to make holes strictly along one line.
- For drilling, you can use a screwdriver or electric drill. When all the holes are ready, the pipes are laid out in rows in their permanent place.
- The drip lines are connected to the central pipe with tee fittings. The other end of the perforated pipe is closed with a plug. A simple plug option is a small wooden peg, rounded and fitted to the pipe diameter.
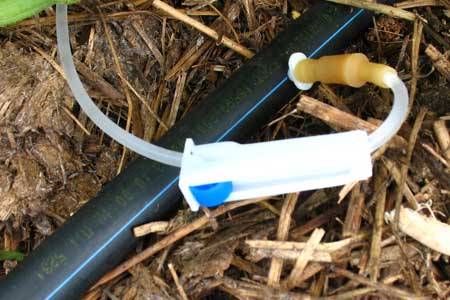
- To supply water in portions, medical droppers are screwed into the holes. Thanks to the adjusting wheel on its body, the supply of a certain amount of water is individually set for each crop.
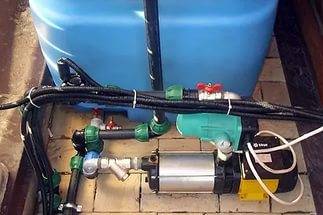
- Now is the time to return to the tank. The bottom of the container is drilled using an electric drill with a crown. The diameter of the cutting tip must match the size of the adapter fitting. Further, from the cut hole, a chain is assembled from an adapter fitting, a ball valve and a filter. If a fertilizer tank is provided in the system, a tee is cut under it. The entire assembled chain of fittings is connected to the central pipe and the supply of the feed water supply is started. From the central water supply system, you can simply stretch a pipe into the tank. From a well or well, water will have to be supplied with a deep or surface pump. Alternatively, you can install a pumping station.Advice! To control the pumping of water, a float with a valve used in plumbing must be installed in the tank.
- When everything is ready, you can turn on the pump, pump a full tank of water and check the system for operation.


You can improve drip irrigation by adding soil moisture sensors and an electric water cut-off valve. Their work is controlled by a special electronic device - a controller. Such drip irrigation becomes fully automated, requiring rare human participation in its maintenance.
To help the gardener, a video of do-it-yourself drip irrigation at the dacha is presented:
Drip irrigation from PET bottles
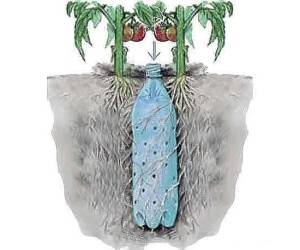
If the summer resident does not have the opportunity to build an irrigation pipe system, ordinary two-liter PET bottles will be the way out of the situation. These containers will help ensure watering of a small garden for a couple of days during the absence of the owner. Let's look at two examples of how to make drip irrigation out of old PET bottles in the country.
The essence of the first method is to bury a bottle of honey with plant roots. But before that, it is necessary to make holes in the side walls. Their number depends on the composition of the soil. For sandstone, 2 holes are sufficient, and for clay soil, 4 or more must be made. You can put the bottle in with the neck up. Then the water will have to be poured using a watering can. The second option is to twist the bottle with a cork and dig it in with the neck down, and cut off the bottom. It is more convenient to pour water into a wide hole.
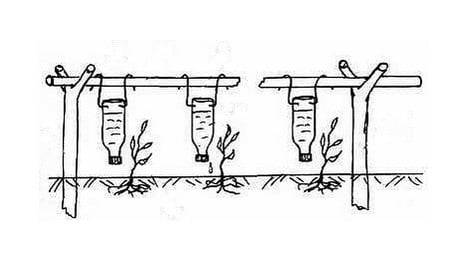
The second option for primitive drip irrigation involves hanging bottles with the neck down over each plant. One hole is drilled in the cork, and the bottom is cut to fill the water.
The video shows an example of using PET bottles for irrigation:
Having made drip irrigation in the country with his own hands, the owner may not worry about garden crops during his absence. Plus, the plants will receive high-quality irrigation, which saves the summer resident from everyday worries.


