Content
Each owner needs a shed on his own plot, but one does not always want to bear the high costs of building it. It will be easier and cheaper to build a utility block after the construction of a residential building, since there are always extra materials left. But what if a person has nothing in his hands, but a utility room is still needed? Now we will look at what you can build a barn with your own hands cheaply and quickly.
Determining the purpose of the barn

Before you build a cheap barn, you need to decide on a number of important questions. The design of the utility block will depend on this, and from what you will build it:
- When erecting even the most inexpensive structure, ask yourself the question, why do you need this shed. The answer according to the principle: "It will be useful for the future" or "In order to keep up with the neighbors" - will not work. You need to know the purpose of the barn. For example, if you need a woodshed, it will be cheaper to assemble a frame utility block from boards and beams. A strong and warm building is needed to keep animals. From cheap material, it is better to give preference to foam concrete.
- The amount of costs depends on the size of the utility block. If the built barn will be used for keeping poultry or animals, you need to roughly calculate how many livestock will live indoors.
- It will be possible to build a barn cheap only on your own. If it is planned to use the services of hired builders, then about half of the funds will go from the allocated budget to pay for the work. You also need to buy the right material. Often, utility blocks are erected from used bricks or cinder blocks. They even use old lumber, which is sometimes sold by subsidiary plots after dismantling buildings. From cheap new materials for walls, foam block or wood concrete can be distinguished.
Having decided on all these questions, you can already begin to calculate the budget for the future construction.
Cheap barns options
Now we will consider several options for how to build a barn with our own hands, so that it costs less to the owner.
Frame shed - cheap and fast
The first place among cheap sheds should rightfully be given to the frame structure. It will not be possible to build anything faster than such a utility block, and even a person without construction experience can do all the work on his own.
Let's get to know how the order of construction of the utility block looks roughly:
- Before starting construction, you need to make a drawing of the barn. Guided by the scheme, they mark the site. The site is cleaned of debris and vegetation, after which an embankment about 15 cm thick is made of gravel, crushed stone or screenings.
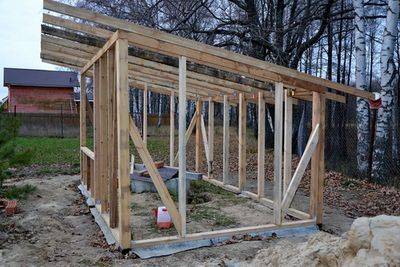
- Frame sheds are usually placed on a columnar foundation, but our goal is to build cheaply and quickly. This means that the support legs of the frame themselves will serve as the basis. To do this, take a bar with a section of 100x100 mm and grease one end of all the pillars with bitumen. You need to process a section about 70 cm long. Two layers of roofing material are wound on top of the hot bitumen.
- Adhering to the markings, holes 80 cm deep are dug around the perimeter of the future building.A layer of rubble or gravel 15 cm thick is poured onto the bottom.Racks are inserted into each hole, leveled vertically, and then poured with concrete mortar. To get a shed roof on a frame shed, the front pillars are made 60 cm higher. It is optimal to install the pillars on the front side of the utility block with a height of 3 m, and the rear ones - 2.4 m.
- Further, a horizontal strapping from a bar is nailed from above and below.For the rigidity of the frame, you need to make a couple more intermediate straps.
- For the manufacture of a shed roof, floor beams are attached to the beam of the upper frame strapping with a step of 60 cm. For this, a board with a section of 50x100 mm is used. The length of the beams should protrude from the frame on both sides at least 50 cm. The resulting overhang of the roof protects the walls from rain.
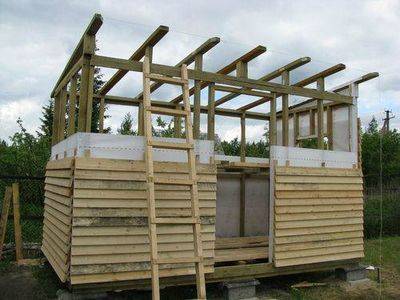
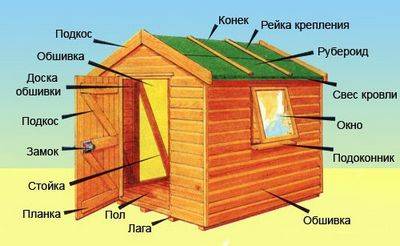
- Sheathing of frame sheds is usually performed with a wooden board or clapboard. Moreover, they can be nailed vertically or horizontally. The method of fastening the skin is shown in the photo. The board is nailed with an overlap to avoid the formation of gaps. With the cheapest option of a frame shed for wall cladding, the use of a slab is allowed.

- Now it remains to cover the finished utility block. The cheapest roofing material is slate or roofing felt. First, a crate is nailed onto the floor beams. For roofing material, it is made solid of plywood or OSB. A board 25 mm thick is nailed under the slate with a step of 40-50 cm. Roofing board is used as waterproofing.
The video shows the manufacture of roof sheathing:
- The floor inside the frame utility block is laid from boards or OSB boards. The ceiling is lined with similar materials. For a winter shed, all the cladding elements are made double, and thermal insulation is placed in the voids. You can use mineral wool, and cheaper - sawdust.
The frame shed will last at least 10 years. During this time, perhaps the owner will be able to save money for a more serious building.
In the video, an example of the construction of a frame shed:
Hozblok from corrugated board
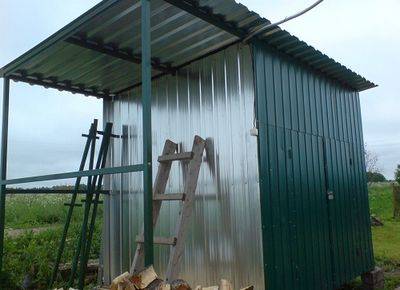
To build not only a cheap, but also a beautiful utility block will turn out from corrugated board. The material is inexpensive and very light, in addition, it will last for many years. The only drawback of corrugated board is its weak rigidity. Before sheathing the walls, the shed frame will have to be reinforced with additional jibs and lintels.
In fact, the utility block made of corrugated board is an ordinary frame shed. Only the cladding material differs. The frame is assembled from a bar, but it is better to give preference to a profile pipe. The costs will not be much more, but once having built a metal structure, it will be enough for the owner for a lifetime. The profile frame is assembled by welding. Sometimes craftsmen fasten the elements with a bolt connection.
Fasten the corrugated board with galvanized self-tapping screws with a rubber washer. When cladding walls, it becomes necessary to trim sheets. It is better to do this with metal shears. If not, you can use a hand tool. But with such scissors it is easy to cut the corrugated board across the waves. It is difficult to do this along the length, since the stiffeners do not allow the sheet to bend.
You can use a grinder to cut sheets, but the abrasive wheel burns the protective coating of the profiled sheet. Over time, this area will begin to rust. If there is no other way out, you can cut the sheet with a grinder, and then it will be easier to cut the burnt edge with scissors. Alternatively, the place of the cut can be hidden under another sheet, because the laying is still done with an overlap. In the corners of the shed, around the window and doorway, the trimmed edge of the corrugated board can be hidden under the additional elements.
Reliable and inexpensive animal and poultry shed
If you need to cheaply and quickly build a barn for keeping poultry or animals, then you will not find better foam blocks of material. Of course, the utility block will cost more than the frame structure, but it will last for many decades. Moreover, a foam block shed is excellent for winter use.
The work on the construction of the barn is performed in the following sequence:
- A foam block shed is considered a capital structure. Here you need to seriously approach the preparation of the project and the development of drawings.This will help to calculate the required amount of material as accurately as possible.
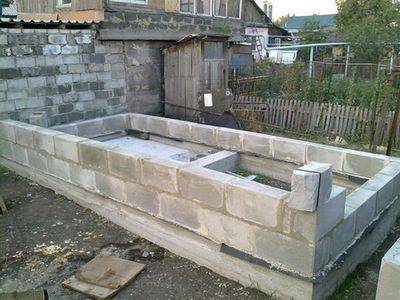
- Construction begins with marking the site for the strip foundation. Further actions include digging a trench up to 80 cm deep. The width of the concrete tape is made 5-10 cm more than the wall thickness.
- Formwork is installed around the trench. The bottom is covered with a 20 cm layer of expanded clay or crushed stone with sand. Now this pillow and the walls of the trench are covered with roofing material so that the liquid solution is not absorbed into the ground.
- Inside the trench, a reinforcing frame in the form of a box is knitted from steel rods. It is optimal to use reinforcement with a thickness of 12 mm for this. When the frame is ready, the trench is poured with concrete mortar with the addition of rubble. In height, the tape should protrude from the ground by at least 10 cm.
- After about a month, the concrete tape will gain its strength, after which you can start building the walls. First, the foundation is covered with two layers of roofing material. The laying of foam blocks begins from the corners, gradually moving to the sides. It is better to use a special adhesive mixture as a solution. It is sold in any hardware store. In the worst case, a concrete solution is also suitable.
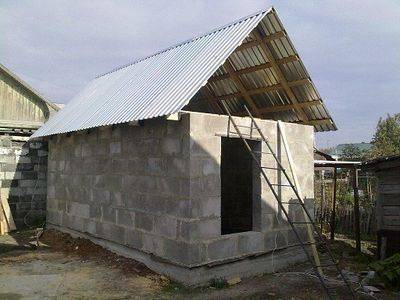
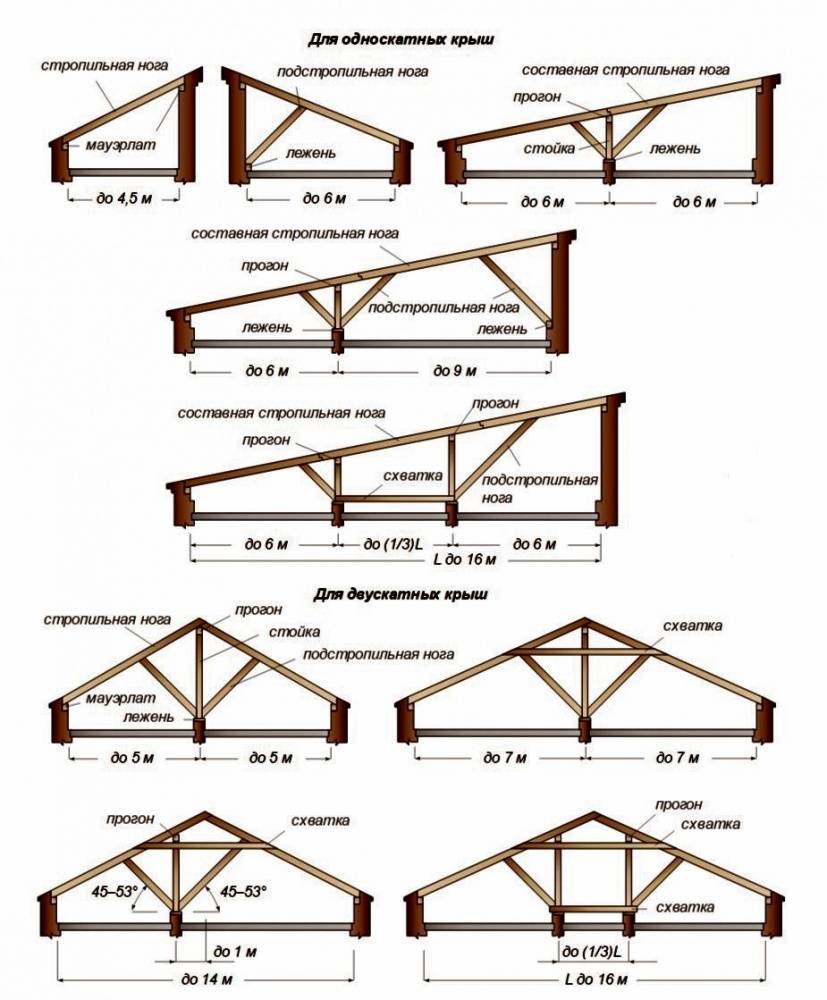
- When all the walls are lined up, the turn comes up to the roof. On such a shed, you can install a single or gable roof. The first option is simpler and cheaper, and the second roof design allows you to organize the attic space for storing things.
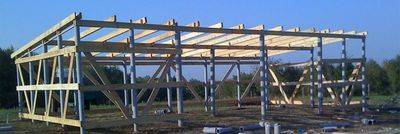
- The foam block is considered a soft material. In order to correctly distribute the load from any roof structure, a Mauerlat from a bar is laid on the walls. Overhead beams are nailed on top, and then a shed or gable roof rafter system is installed.

It is advisable to choose a high-quality roofing for a barn made of foam blocks. Slate or corrugated board is suitable from inexpensive materials. What to make the floor inside the barn depends on who will live in it. Better send the boards to the goats. For poultry, a clay floor with sawdust or straw is suitable. The pigs will have to pour a concrete screed, but it is advisable to lay waterproofing and insulation under it. And in the pen, where the pigs will sleep, it is necessary to lay boards.
Conclusion
To truly build a cheap barn, you must first take a closer look at what material is on hand. After that, you can already start off with the choice of the type of building.


