Content
- 1 What the photo relay consists of, and the principle of its operation
- 2 And you can't do without a photo relay at home?
- 3 The optimal place for the photo relay
- 4 Main technical characteristics of the photo relay
- 5 Varieties of advanced photo relays
- 6 The difference between the photo relay at the installation site
- 7 Examples of connection diagrams
- 8 How to deal with wires
- 9 Photo relay sensitivity setting
As darkness falls, street lights come on along the roads. Previously, they were turned on and off by utility workers. Now the work of the lanterns is controlled by an electronic device - a photo relay. Lighting automation is especially convenient in remote areas, where it takes long for service personnel to get there. Photo relays can be used for street lighting not only for utilities, but also for owners of their own plots. We will now try to find out what this device is.
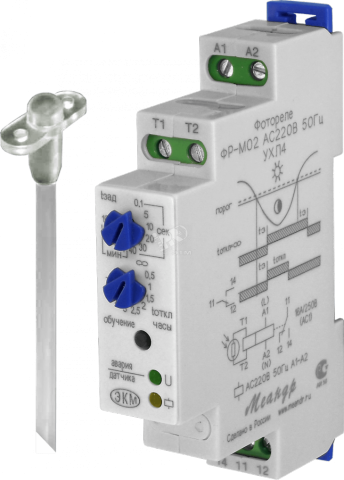
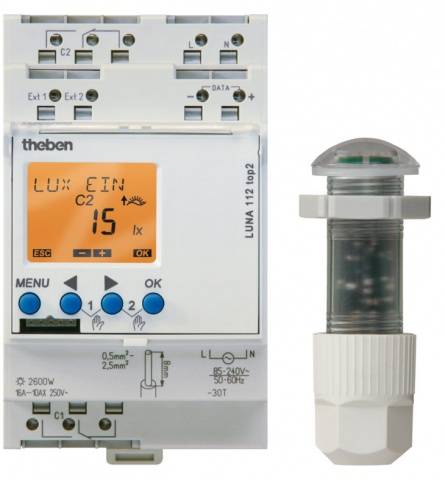
What the photo relay consists of, and the principle of its operation

This device has a lot of names: photosensor, photosensor, photocell, etc. No matter how you call it, the essence remains unchanged. The photo relay device is very simple. There is an electronic board with a set of radio components inside the device case. The soldered circuit of the photo relay forms an electronic key based on a photosensitive element. It can be a photoresistor, photodiode, etc. Additional elements of the circuit prevent erroneous triggering of the sensor, help to make precise settings and are responsible for other useful functions.
The work of the photo relay can be seen by the photoresistor. This part has its own resistance, which prevents the passage of current. With the onset of darkness, the resistance of the photoresistor decreases. The current flows freely, which leads to the operation of the electronic key. This leads to the closure of the device contacts to which the lighting devices are connected. With the onset of dawn, all actions are reversed. An increase in the resistance of the photoresistor prevents the flow of current. The electronic key opens the contacts, and the street lighting is turned off.
And you can't do without a photo relay at home?

An illiterate question about the need to use a photo relay can be asked by a person who does not care about the convenience of his home and the arrangement of the adjacent territory. The work of the device is aimed not only at creating beautiful light accents. The photo relay is used for the convenience of lighting control, as well as energy saving.
Let's look at a few arguments in favor of the device:
- Let's start with convenience... The lighting system is controlled by a switch. It is usually located by the door near the room. Indoors is normal. And take, say, your yard. To turn on the light, you have to get to the switch in the dark. And if the barn is located in the back yard? A long journey begins in the dark with a flashlight. The photo sensor will allow you to customize the illumination of frequently visited places, which will save the owner from wandering in the dark.
- Now about saving... Owners of large private plots install many lighting fixtures to illuminate the garage, resting place, house entrance and other places. For the convenience of controlling the entire system, you can use one switch, but what will be the power consumption. The light will burn even in unnecessary places. And in the morning, after a stormy rest, it's too lazy to get up early to turn off the lights. A device with a photosensor will do everything by itself at dawn.And if you also use a motion sensor, in general, the lighting will turn on only where there are people.
- Photo relay - primitive, but at least some kind of protection from the thiefin. The light turned on at night in the absence of the owners in the country creates an imitation of presence. Not every petty hooligan dares to enter the yard.
If the above arguments are unconvincing, you can do without a photo relay. But is it necessary to save on your own comfort, if the device does not cost so much money. Moreover, the photo relay can be connected without any problems with your own hands.
The optimal place for the photo relay
For the lighting to work correctly, you need to choose the right location for the photocell:
- from dawn to dusk, the photosensor should be illuminated by the sun's rays or located in the brightest place;
- it is impossible that artificial lighting falls on the photocell;
- the device is placed near the road so that the sensor is not illuminated by headlights;
- the decrease in the sensitivity of the device occurs after the photocell is soiled, therefore the relay is placed at a convenient height for maintenance.
Choosing the right place for the photo relay is a difficult task. Usually, this process involves moving the instrument around the yard until a positive result is achieved.
Main technical characteristics of the photo relay
In order for the photo relay to work properly in the lighting system, it must be correctly selected taking into account the technical characteristics. All devices have the following parameters:
- Each brand of relay is designed to work with voltages of 12, 24 and 220 volts... For home lighting, the latter option is used. When using low-voltage devices in a 220V network, converters will have to be installed. It's expensive and doesn't always work well.
- Amperes - the second important characteristic of the device. To calculate the maximum switching current, the sum of the power of all lamps in the lighting system is calculated. The result is divided by the mains voltage. At home, it is 220V. The figure obtained after the calculation must be less than the amperes indicated on the photo relay. Otherwise, the device will quickly fail.
- From the sensitivity of the photocell the threshold for turning on and off the lighting depends. It is optimal to use a device with parameters 2-100 Lx or 5-100 Lx.
- The delay in the response of the photosensor does not immediately turn off the lighting after a short hit of light from the headlights of a passing car. The optimal indicator of the delay is from 5 to 7 seconds.
- Appliance power affects energy savings. Typically, during operation, there is a consumption of up to 5 W, and during standby - 1 W.
- Degree of protection indicates the place where the use of the photo relay is allowed. For example, on the street, it is optimal to use a device with an IP44 rating.
In very cold or hot regions, it is important to pay attention to the permissible operating temperature range.
Varieties of advanced photo relays
The simplest photo relay reacts only to incident light. However, it is not always necessary for the bulbs to shine all night. Manufacturers have developed improved devices filled with additional sensors:
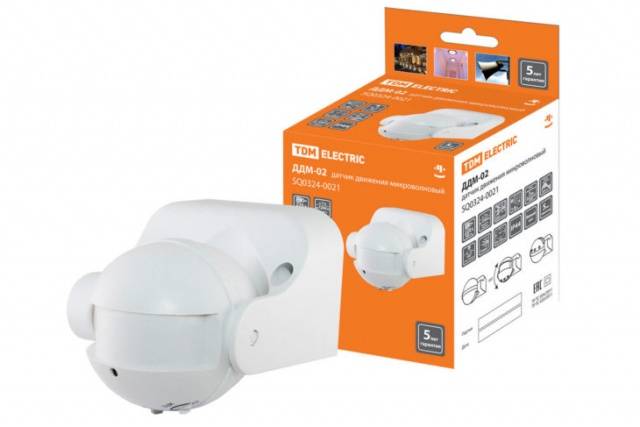
- A device with a motion sensor is very convenient. The lighting turns on only when a moving object, person or animal enters the sensor's range.
- A motion sensor, supplemented by a timer, allows you to configure the device to be triggered at a specific time. The light will turn on, for example, when the owner comes home late from work, and will not blink in the middle of the night from running cats or dogs.
- The programmable device is very expensive. It even allows you to set the date and time when you need to turn on the lights.
Among all models, the most popular are photo relays with a timer and a motion sensor.
The difference between the photo relay at the installation site
Manufacturers produce devices for indoor and outdoor installation. The last type of photo relay is intended for outdoor installation. The electronic circuit of the device is protected by a sealed housing that is resistant to aggressive environmental influences.
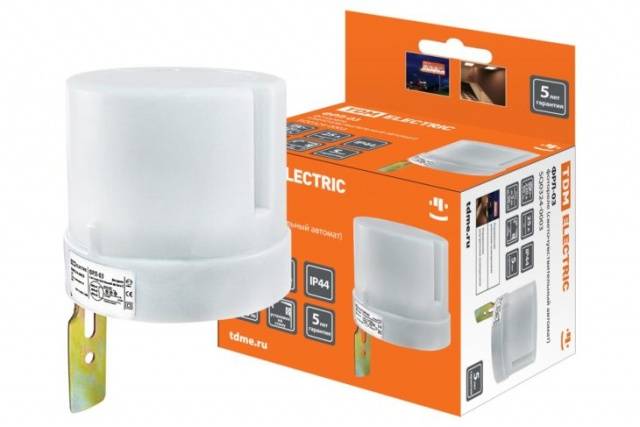
Photo relays for indoor installation are mounted outdoors in a protective case or in an electrical panel inside a building. Only a remote photocell goes out into the street.
If at home it is decided to make controlled lighting with your own hands, it is better to give preference to outdoor devices.
Examples of connection diagrams
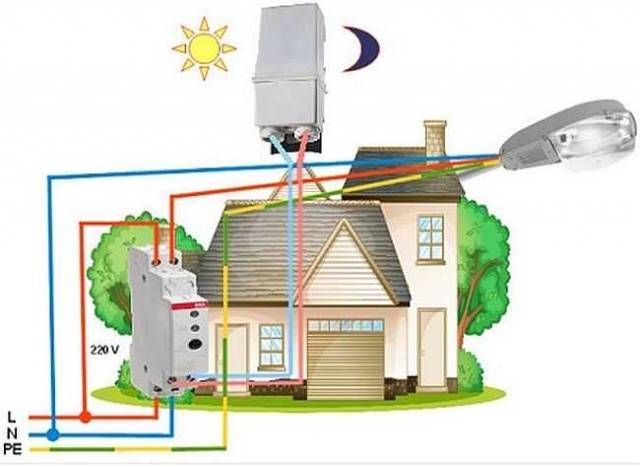
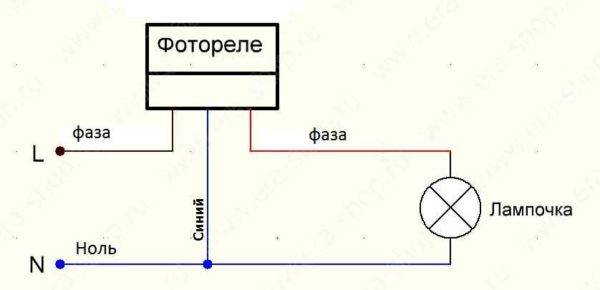
The simplest diagram for connecting a photo relay for street lighting is shown in the photo. The phase wire is interrupted as it is connected to the input and output of the instrument. Further, the phase from the output goes to the light bulb. Zero goes with a whole wire from the bus of the electrical panel. It is connected to the input of the photo relay and the load.
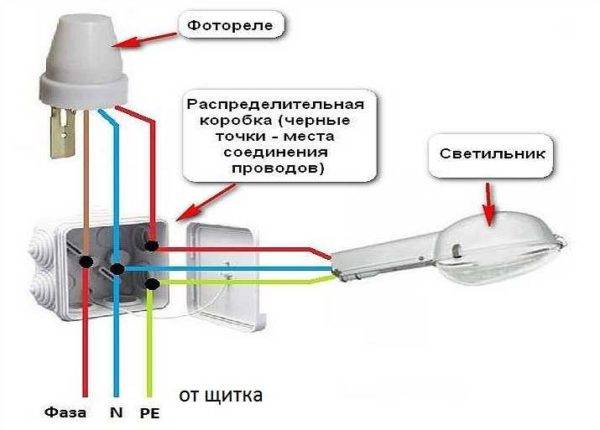
Primitive schemes are not always easy to use and dangerous. It is better to connect the photo relay installed on the street to the mains using a junction box, but it must also be sealed. The photo shows a diagram of how the photo relay for street lighting is connected through a junction box.
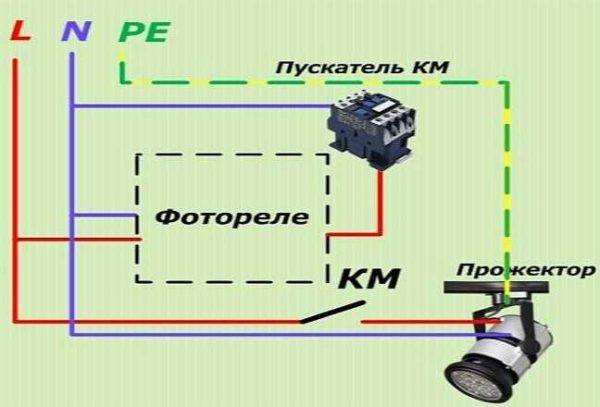
The photo relay can control the operation of lamps of any power. Many of them have built-in chokes. In order for a weak device to cope with a large load, a contactor is added to the circuit. As a result, the power of the photo relay should be enough to control the starter, and with the help of moving contacts it supplies voltage to the lighting devices.
When using a motion sensor, a different connection scheme is used. First, the current from the network is supplied to the photo relay, and from it it is already supplied to the motion sensor and the flashlight. Such a scheme turns on lighting when any object is moving only at night.

Any of the proposed schemes is simple, and can be assembled by hand without any problems.
How to deal with wires
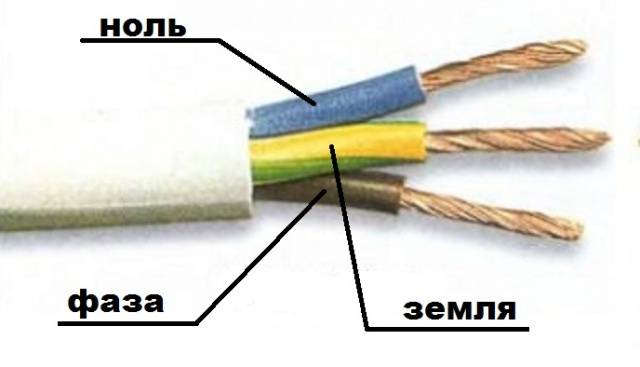
Any model of the device has three multi-colored wires. However, an inexperienced person will get confused even in them. Immediately you need to look at the color of the insulation. Red, black or brown wire is a phase. Blue or green is zero. The third wire is ground. It usually goes green with a yellow stripe.
If the device has only outputs for connection, then look at the letter designation: N - zero, L - phase, PE - ground.
In the video, the photo relay connection:
Photo relay sensitivity setting
The sensor is adjusted only after connecting the annual lighting scheme to the mains. The adjustment sets the limit for the sensor, that is, its sensitivity to light. For this purpose, a plastic screw is installed on the back of the device. To know in which direction to turn it, look at the designation: "+" indicates an increase in the sensitivity of the photocell, and "-" indicates a decrease.

Adjustment begins by turning the screw all the way to the right. If you decide that it is in such darkness that the lights should turn on, slowly turn the regulator to the left. As soon as the lights come on, the setting can be considered complete.
As you can see, the photo relay is a very simple device. Installing it is no more difficult than screwing in a light bulb, and a positive result will already be visible at nightfall.


